Scalable System Architecture with Docker, Docker Flow, and Elastic Stack: Backend Services
Fourth part of the scalable architecture series. Make backend services using NodeJS and Mongo

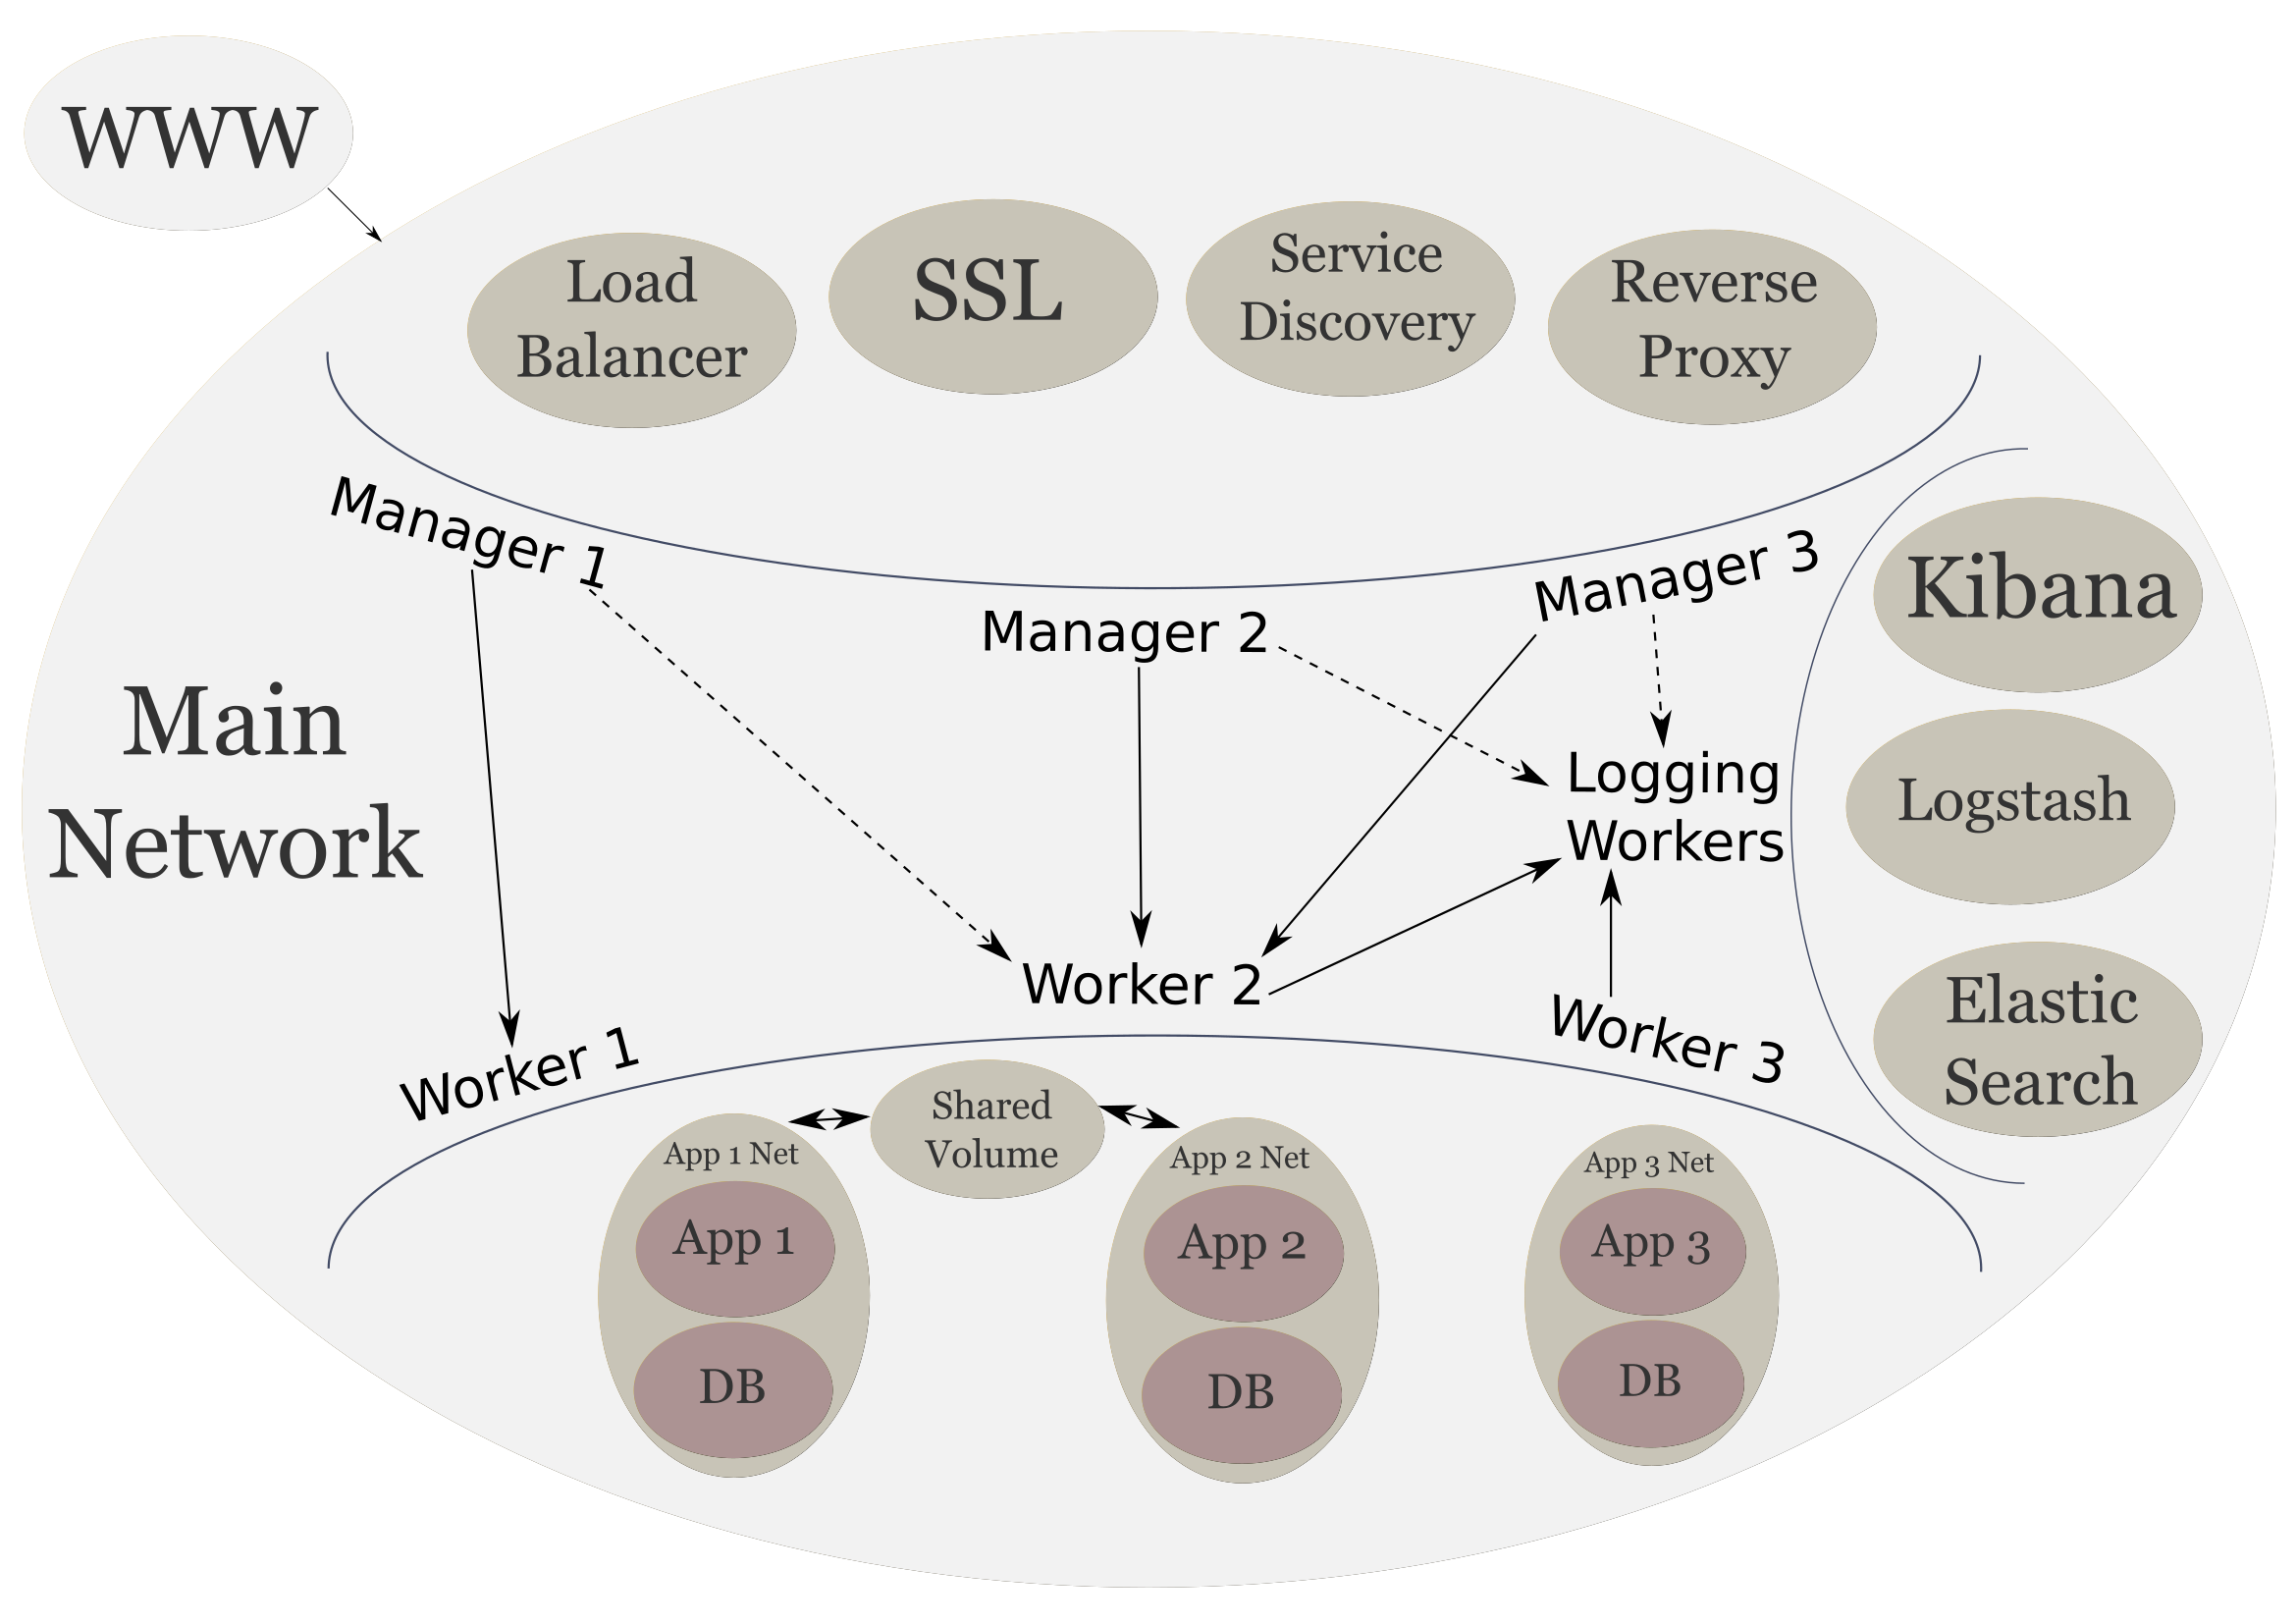
Scalable System Architecture
In the previous post, we added logging services to our cluster. These services are responsible for our logging and visualizations. Now we will be creating our frontend services.
By the end of this post we will have the final cluster that we have been working towards.

- Parts
- Technologies
- NodeJS
- MongoDB
- Backend Services
- NodeJS Service
- App Root
- ./src/app Directory
- ./src/controllers Directory
- ./src/libs Directory
- ./src/public
- ./src/views
- Docker Services
- Done
- Up Next
Parts
- Scalable System Architecture with Docker, Docker Flow, and Elastic Stack: System Provisioning
- Scalable System Architecture with Docker, Docker Flow, and Elastic Stack: Frontend Services
- Scalable System Architecture with Docker, Docker Flow, and Elastic Stack: Logging Stack
- Scalable System Architecture with Docker, Docker Flow, and Elastic Stack: Backend Services (current)
- Scalable System Architecture with Docker, Docker Flow, and Elastic Stack: Limitations and Final Thoughts
Technologies
As before we can install docker for our platform of choice. We will be using docker utility to create our services.
For our backend stack we can use whatever technology we want to create our APIs and web apps. We will be creating our backend services using NodeJS for the server side technology, and MongoDB as our database. But we are not restricted to these technologies and can use PHP, JAVA, MySQL, PostgreSQL, etc.
NodeJS
NodeJS is a server side Javascript framework that allows us to create anything from web apps, to REST APIs, to mobile apps. It is a high performance framework using non-blocking I/O. It can handle tens of thousands of operations per second (if programmed correctly ;-)).
MongoDB
MongoDB is an advanced NoSQL database that is meant for big data. It is also easy to deploy and use. Although its flexibility, if not carefully managed, can easily get out of hand. But we will be careful when persisting our data.
Backend Services
NodeJS Service
Our NodeJS service will have the following file structure:
.
├── Dockerfile
├── index.js
├── package.json
└── src
    ├── app
    │   ├── config
    │   └── index.js
    ├── controllers
    │   └── index.js
    ├── libs
    │   └── logger.js
    ├── public
    └── views
        ├── index.html
        └── layouts
            └── base.html
App Root
First let's take a look at the dependencies in our package.json file:
"dependencies": {
    "body-parser": "^1.16.1",
    "compression": "^1.6.2",
    "express": "^4.14.1",
    "express-minify-html": "^0.9.0",
    "express-nunjucks": "^2.1.3",
    "helmet": "^3.4.0",
    "ip": "^1.1.4",
    "mongodb": "^2.2.24",
    "nunjucks": "^3.0.0",
    "winston": "^2.3.1",
    "winston-logstash": "^0.3.0"
}
We are keeping it simple with this backend service. This will be a simple program that prints Hello Wold! on a web browser, connects to the MongoDB service running on the cluster, and sends logs to our logging stack.
The index.js file at the root of the application simply requires the app and controllers.
require('./src/app');
require('./src/controllers');
This will run the code in both ./src/app/index.js and ./src/controllers/index.js.
The Dockerfile is used to build our image.
FROM node:7-alpine

ENV NODE_ENV production

COPY . /app/
WORKDIR /app

RUN npm install

CMD npm start
We will use this file to build an image called nodeapp1. Similarly to how we built the Logstash image in the previous post.
./src/app Directory
Inside the ./src/app directory, config has nothing in it. If our application had any configuration, like any settings specific to production environment, we could put it in here. Here is the ./src/app/index.js file:
const Express = require('express');
const expressNunjucks = require('express-nunjucks');
const ip = require('ip');
const bodyParser = require('body-parser');
const compression = require('compression');
const helmet = require('helmet');
const minifyHTML = require('express-minify-html');
const path = require('path');
const MongoClient = require('mongodb').MongoClient;

const logger = require('../libs/logger');

const app = new Express();
const server = new Express();
const mongoUrl = 'mongodb://mongo-store/nodeapp';

// Set prod to true for use within views
if (app.settings.env === 'production') {
    app.prod = true;
}

MongoClient.connect(mongoUrl, { autoReconnect: true })
.then((db) => {
    logger.info('connected to mongodb');
})
.catch((err) => {
    logger.error(new Error(err));
});

app.set('trust proxy', true);
app.set('views', path.join(__dirname, '../views'));

app.use(compression()); // Better performance
app.use(helmet()); // Better security
app.use(bodyParser.json());
app.use(bodyParser.urlencoded({
    extended: true,
}));
app.use(minifyHTML({
    override: true,
    exception_url: false,
    htmlMinifier: {
        removeComments: true,
        collapseWhitespace: true,
        collapseBooleanAttributes: true,
        removeAttributeQuotes: true,
        removeEmptyAttributes: true,
        minifyJS: true,
    },
}));
app.use('/public', Express.static(path.join(__dirname, '../public')));

expressNunjucks(app, {
    watch: !app.prod,
    noCache: !app.prod,
});

server.use('/app1', app);

server.listen(8080, () => {
    logger.info(`Started server: http://${ip.address()}:8080`);
});

module.exports = app;
This file sets up our express app, mongo connection, and logger for us. const logger = require('../libs/logger'); contains our logging library. We use the excellent winston library as our logger. There are a lot good reasons to use winston, here one of our main reasons is the Logstash transport. We will later examine the logger in detail.
We have to use two Express instances because we are going to access the app using /app1. So, we create two instances, one to create all of our routes, and the other to tell the proxy that /app1 si the access point. Otherwise, we would have to prepend /app1 to every route that we create.
Then we use the mongodb driver's MongoClient to connect to our mongo service running on the cluster, with the nodeapp collection. We set the autoReconnect option to true because we don't know if the mongo service will be ready before our app tries to connect. If we do successfully connect, we send a log out using the logger. If we can't, we log out the error.
We use app.set('trust proxy', true); be cause are placing the app behind a proxy. The rest of the middleware is pretty standard Express affair. We use Nunjucks as our templating engine.
It is important that we start the server the with second instance of Express.
./src/controllers Directory
Next we'll take a look at the ./src/contollers/index.js file:
const app = require('../app');

app.get('/', (req, res) => {
    res.render('index');
});
We simply have one route that renders the index page. That page will contain the Hello World! output. We don't need to prepend /app1 to the route because we are using two instances of Express.
./src/libs Directory
Now let's take a look at our logger library:
const winston = require('winston');
require('winston-logstash');

const logger = new winston.Logger({
    transports: [
        new (winston.transports.Console)({
            colorize: true,
            timestamp: () => new Date().toLocaleString(),
            handleExceptions: true,
            humanReadableUnhandledException: true,
        }),
    ],
});

if (process.env.NODE_ENV === 'production') {
    logger.add(winston.transports.Logstash, {
        port: 9000,
        node_name: 'nodapp1',
        host: 'logstash',
        handleExceptions: true,
        humanReadableUnhandledException: true,
    });
}

logger.exitOnError = false;

module.exports = logger;
Here we use winston to create our initial logger which only logs to the console. However, when the NODE_ENV environment variable set to production, as it is in our Dockerfile, we will add the Logstash transport to our logger. The logger also handles exceptions and makes them human readable.
./src/public
The public directory can contain any static that our app may have. We have setup our Express app to access these public resources using the /public URL path.
./src/views
Finally, our views directory contains all of our templated views. The index.html is as follows:
{% extends "./layouts/base.html" %}

{% block content %}
    Hello World!
{% endblock %}
This file simply extends that base layout and prints Hello World! to the content block.
The layouts/base.html file defines most of the basic HTML code:
<!DOCTYPE html>
<html>
    <head>
        <title>Home</title>
        <meta name="viewport" content="width=device-width, initial-scale=1"/>
    </head>
    {% block css %}
    {% endblock %}
    <body>
        <div class="content">
            {% block content %}{% endblock %}
        </div>
        {% block scripts %}
        {% endblock %}
    </body>
</html>
Here we define a few blocks for css, content, and scripts. This file doesn't really have anything else going for it.
Docker Services
Now we need to build a Docker image out of our Node app and then deploy to the cluster. To build we can use a command similar to the one we used to create our own Logstash image. We make sure that we are in the root of our app and execute the following:
docker build -t <registry username>/nodeapp:latest .
Once the image is built, we can push it to our registry of choice. As before we will simply use hub.docker.com as our registry. We can login to Docker hub using the following command:
docker login
Then use the following command to push the image to the hub:
docker push <registry username>/nodeapp:latest
Now that our image is pushed. We can start creating our services and related networks.
# Create apps network
docker network create --driver overlay apps_net

# Create mongo-store service
docker service create \
    --name mongo-store \
    --network apps_net \
    --mount type=volume,source=mongo-data,destination=/data/db \
    --constraint 'node.role == worker' \
    --constraint 'node.labels.logger != true' \
    --replicas 3 \
    mongo:3

# Create app1 service
docker service create \
    --name app1 \
    --network main \
    --network apps_net \
    --network log_net \
    --label com.df.notify=true \
    --label com.df.distribute=true \
    --label com.df.serviceDomain='customdomain.com' \
    --label com.df.servicePath=/app1 \
    --label com.df.port=8080 \
    --constraint 'node.role == worker' \
    --constraint 'node.labels.logger != true' \
    --replicas 3 \
    <registry username>/nodeapp:latest
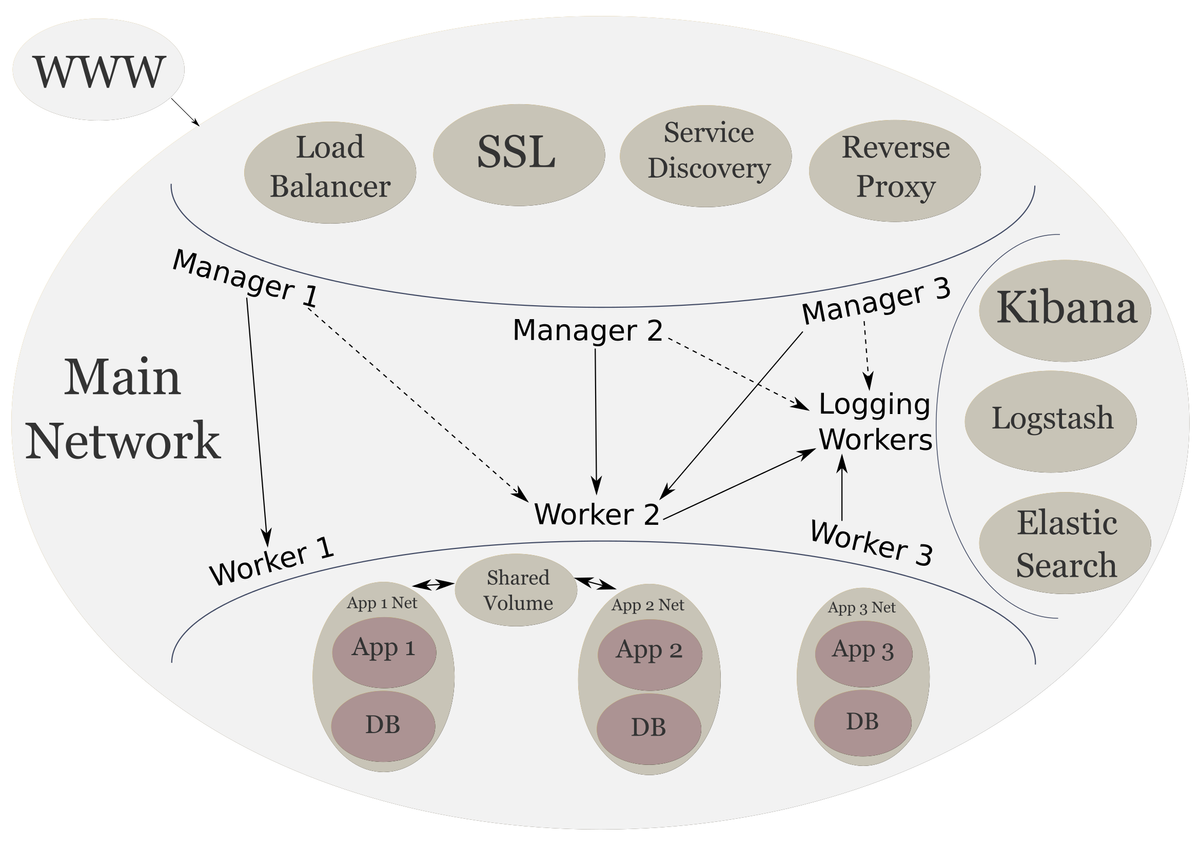
Our Mongo service only needs to connect to the apps network. We mount a volume to it so the persisted data is not lost when the service is destroyed. Finally, we need to add constraints to make sure it only starts on the worker nodes, and only those worker nodes that aren't dedicated to our logging stack.
Our app1 service must connect to all three defined networks because it must communicate to services in all of those networks. We add the required labels to notify our swarm listener of the configuration of our app. And we use the same constraints as before to make sure we only start service on the right worker nodes.
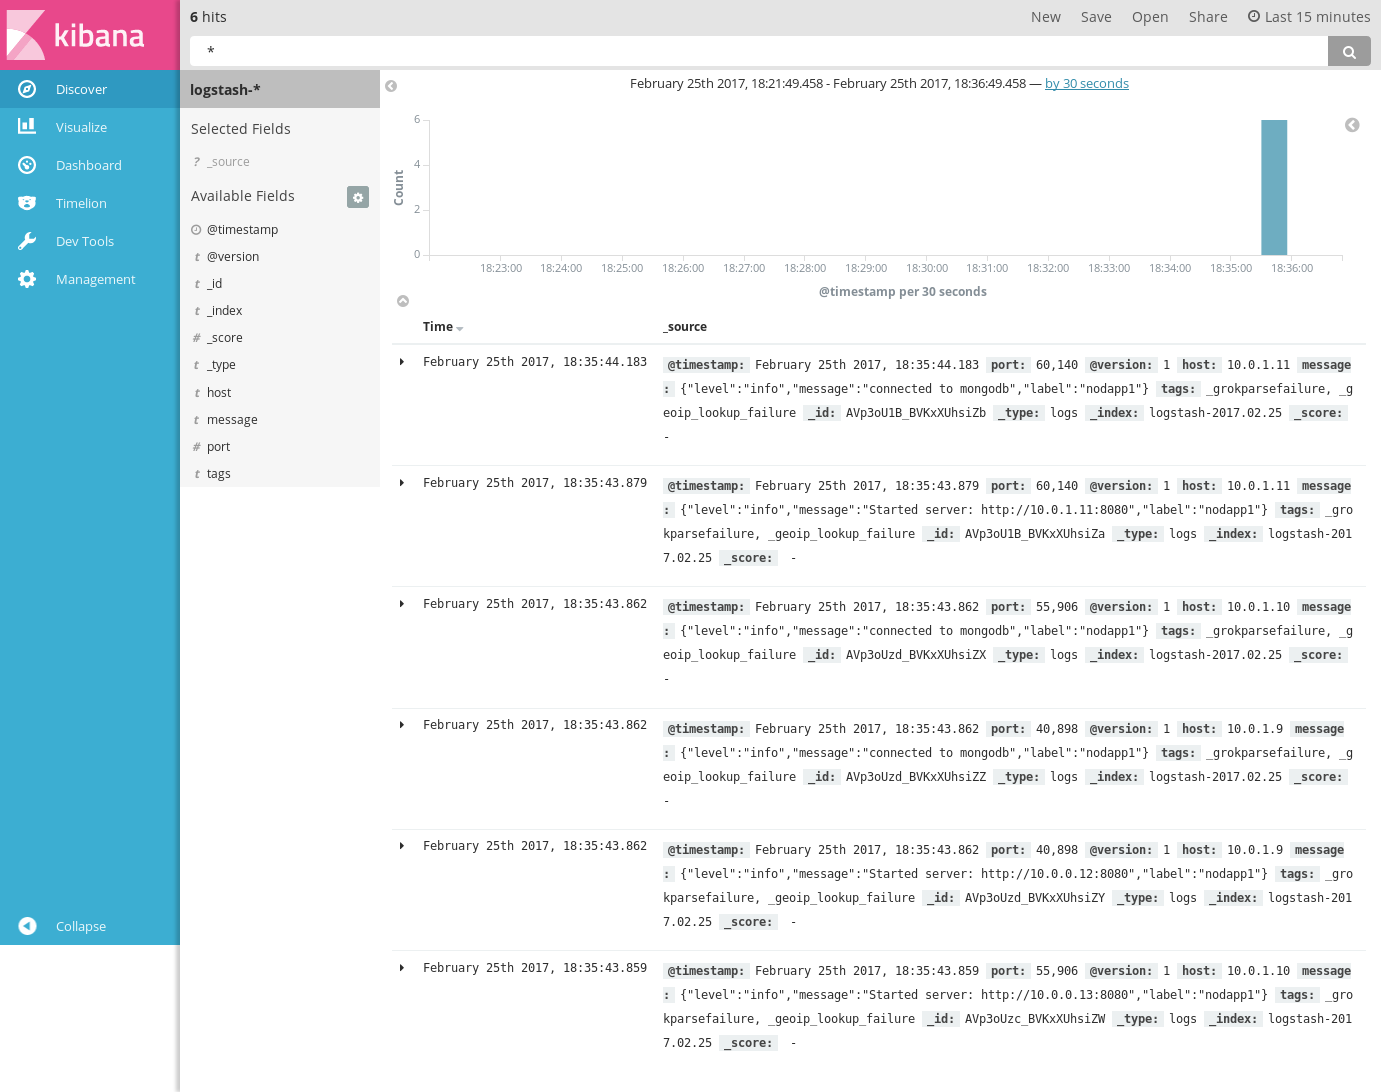
We can verify our node app is running by visiting customdomain.com/app1. We should see Hello World! written on screen. And we can verify that our logger is working by visiting logging.customdomain.com and checking Kibana. As we can see from the messages below, the logger is sending the logs to Logstash correctly.
Done
We have finally completed the original infrastructure that we wanted to create. Now we have communication going back and forth between the frontend, backend, and logging services.
Up Next
In the next post I will document some of the challenges, tips, tricks, and limitations of the current setup.